Showing posts with label Pillows. Show all posts

Tuesday, January 17, 2012

The $150 Living Room UpDate

Confession...


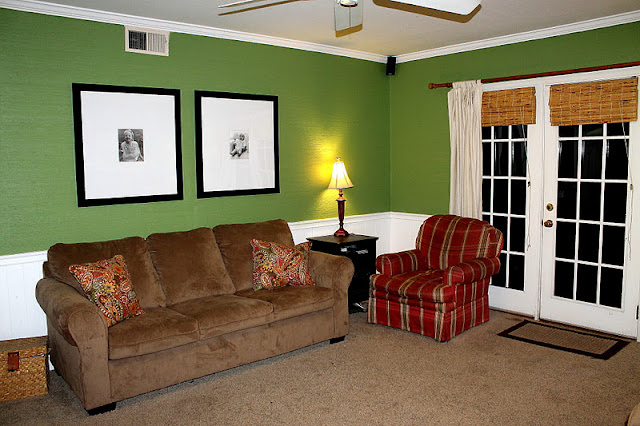
I finished my part in Shan's living room about two months ago. That's right. It took me about a week to prime, paint, sew panels for the windows, and figure a few things out. It's great...completely different...and she loves it. We stayed on a tight budget, only spending money on paint, fabric, and a few other things. No new sofas, chairs, pillows, or flooring. We shopped from her attic and around the house. It's a great feeling when you can get a transformation without breaking the bank. Always a goal of mine. Always.

Before:


After:


Here's the breakdown of what was done...

The walls and doors were primed and painted. I used Better Homes and Gardens interior paint in eggshell from WalMart...no paint snobs here! The color is BHG809. She kept the sofas and I switched the pillows with some that were in her sitting room. I kept the original curtain rod, just painted it black and added new, longer panels made from painter drop cloths. The pictures above the sofa remained, as did one of the painted black side tables. Another black table was moved in from the dining room. The lamps (I love them!) were a treasure she found in her moms attic. Originally a terracotta color, they were painted with American Accents Spray Paint in Lagoon (it's made by Rust-Oleum) and lightly glazed with a brown stain. When I took her to the store to look at colors to paint the lamps, Shan looked at me and said, "You know turquoise is my least favorite color, right?!?"...well, guess who won?...just saying...

New lamp shades were purchased (on sale) at Target to complete that side of the room. On the other side I took down the pictures on the wall and moved out the round table and lamp. We found an antique pine side table (with fabulous spindle legs) at a thrift store for $35. It is in awesome condition and fit perfectly! I added a painting of a nest to bring in a little color and built and stained a farmhouse style backing for it to hang on. The lamp came from the dining room, but she didn't need it in there anyway :)

And the bookshelves...oh, the glorious multi colored bookshelves that used to look like this...


got a fresh coat of primer and paint, a few shelves were removed, and the rest were styled a bit with things she already had...now look like this...


There were several things that made this room difficult. There are a lot of doors, and windows, and built-in bookshelves. I tried her furniture in a million...ok, maybe a trillion...different places. In the end, the room was too small to have it any other way. I wanted the sofa to be centered and floating in front of the door to the backyard. When I tried, that put it in the middle of the room, leaving no area for the love seat or anything else. Boo. So everything went back to the walls, while the husbands chair was moved from one side to the other and pulled out just a bit. Speaking of the chair...oh...the chair...did anyone wonder where it went?...here you go...


This brings me to the reason I haven't written about this room. She still has the red plaid chair, and still doesn't know what to do with it...recover, slip cover, or look for a replacement. This is real life though, and sometimes decisions can't be made in a day, a week, or even a month. Here is the break down of what was spent, and yes...that is another consideration in the chair...

Paint, Primer, and Supplies $40
Drop Cloth Panels $20
Nest Painting and Wood Frame $30
Paint for lamps $3
Lamp Shades $28
Antique Pine Side Table $35


The grand total is $156. That is a lot of bang for the buck!!!

Rachel :)


Pin It

Thursday, October 27, 2011

The Details of the Back Deck

When Jules and I first started talking about this project, the number one thing she wanted from her back deck was for it to become another dining area. As much as I would have loved to used the table and chairs they had, it wasn't working in the area. Big, round, and bulky, the table only sat four people with no room for more. I have a love for farmhouse tables and picnic tables, so out with the old and in with the new...

Before

After

After
The new picnic table fits in the area perfectly. You can sit eight kids or six adults with plenty of room on all sides to move around. I purchased the traditional picnic table from Lowes. After a good sanding, I stained it using Cabot Dark Walnut Wood Stain and used Cabot Spar Varnish in Satin for the nice sheen and to protect it from the elements. A two inch hole was drilled in the center of the table, and was I excited to use the umbrella she already had.

She also wanted a buffet that would act as storage and could double as another eating area. I found this great piece of furniture in her basement. Yes...the basement...


I took it home and cleaned it with the original plan to paint it. After much thought I decided it would be a lot easier to paint it later than to strip it...so I left it as is...

before

After
The vignette is complete with two topiaries in galvanized buckets. I was super happy she wanted me to remove the original light fixture and even happier when she liked the nautical one I found at Lowes. The counter stools from Overstock.com are a metal replica of a tolix stool, and she LOVES them. They fit perfectly and are super functional giving more seating there or at the ends of the picnic table. Above the buffet is an antique (yay) glass window that I turned into an outdoor chalkboard. I definitely have an obsession with chalkboards. An upside down drawer pull was screwed into the bottom corner of the frame so they never have to hunt for chalk. And...how adorable is that message!?!...I love this family!!


Remember the mismatched back doors?...


They now stand out and match after getting a fresh coat of a black satin oil based paint. I love a good black door!


In the corner was another fabulous find...When Jules and I met for the first time, the kids were having a great time pushing this vintage metal cart with caster wheels around the backyard...


Yes, it was a little sad that day, but it loving it's new home with with an old metal red cooler. How awesome is that!?! Another find from my favorite thrift store in town!


And this is the area where the grill used to sit. A few weeks ago it looked liked this...


A few pallets, cushions, and pillows later they now have a comfortable place to curl up with a good book!


Jules also had a few planters that she wasn't using. Isn't great when you can use things that you already have? I put them to good use...


They are now on the railing of the stairs to the deck complete with pansies...


And that's the entire tour! Last post about the deck...I promise!

Rachel :)


Furniture Feature Fridays
Pin It

Tuesday, September 6, 2011

You Win Some, You Lose Some Part I

I began the long weekend with 4 projects in mind. Actually, I always have a million projects in mind...this weekend I followed through with 4. If you've been reading, then you know two were successful. My new door numbers and my skirted kitchen sink rock my socks. The other two are equivalent to poop in my pants. Seriously.

Last week I worked on some pillows for Marlene. She's trying to brighten up her living room and instead of replacing the sofa, she's replacing the pillows. Actually, she's clicking on the computer and ordering fabric. I'm replacing the pillows. She demanded kindly told me that she wanted 6 pillows: two from Target, two yellow ikat, one navy and white chevron, and one solid navy. She bought the Target pillows, ordered ikat fabric (shipped it to me) and told me she would buy a navy one. The yellow ikat pillows turned out great! The chevron...well...

Marlene never found a navy and white chevron fabric that she liked. She got the bright idea i could sew stripes together and create a chevron...no thanks. I found a great white linen and thought maybe, just maybe, I could paint a chevron pattern on it. I was wrong. Boo. I cut the fabric, then cut 64 pieces of tape to put over the white. I then painted in between the tape with navy fabric paint. I thought it would be genius until I pulled the tape off and discovered the paint had bled underneath. I then sent Marlene a text that said, "I hate you and your chevron pillows." I didn't hear from her for two days which is like ten years in our world. While she was out living up her childless 3 day weekend, I was at home laboring over labor day. Laboring over her pillows...see the following...


Perhaps I should have titled this posted, "how to make crappy drippy chevron pillows"...tomorrow I'll follow up with my other poop in the pants project.

Rachel :(

I'm supposed to photograph fruit for todays challenge, but have none in the house. Seriously. Not even canned oranges. I'll post again tonight...


Pin It

Thursday, July 28, 2011

Number Love

If you haven't noticed that numbers are everywhere these days, you might be living under a rock! Used for more than being able to tell which house is yours, number have made the move from outside to in. Check out these great examples...

Pinterest

Pottery Barn

Number Napkins...from Etsy

Aidan Gray Home

I looking for a weekend project and any of these will do! On another note, I am picking up 6 pallets today...alll FOC...yay! I am looking forward to taking them apart and upcycling them into something great. Really great!

Rachel :) Pin It