Confession...
I finished my part in
Shan's living room about two months ago. That's right. It took me about a week to prime, paint,
sew panels for the windows, and figure a few things out. It's great...completely different...and she loves it. We stayed on a tight budget, only spending money on paint, fabric, and a few other things. No new sofas, chairs, pillows, or flooring. We shopped from her attic and around the house. It's a great feeling when you can get a transformation without breaking the bank. Always a goal of mine. Always.
Before:
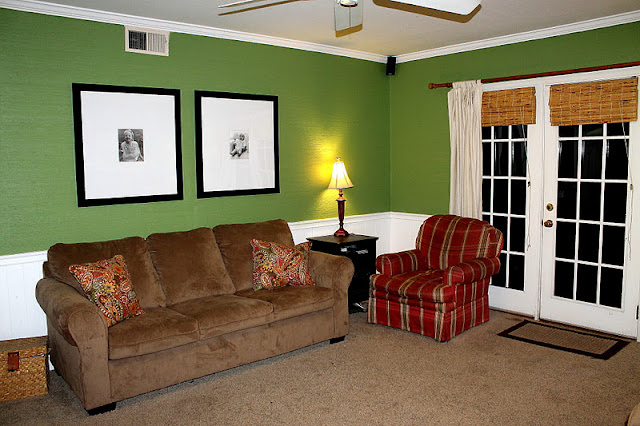
After:
Here's the breakdown of what was done...
The walls and doors were primed and painted. I used Better Homes and Gardens interior paint in eggshell from WalMart...no paint snobs here! The color is BHG809. She kept the sofas and I switched the pillows with some that were in her sitting room. I kept the original curtain rod, just painted it black and added new, longer panels made from
painter drop cloths. The pictures above the sofa remained, as did one of the painted black side tables. Another black table was moved in from the dining room. The lamps (I love them!) were a treasure she found in her moms attic. Originally a terracotta color, they were painted with American Accents Spray Paint in Lagoon (it's made by Rust-Oleum) and lightly glazed with a brown stain. When I took her to the store to look at colors to paint the lamps, Shan looked at me and said, "You know turquoise is my least favorite color, right?!?"...well, guess who won?...just saying...
New lamp shades were purchased (on sale) at Target to complete that side of the room. On the other side I took down the pictures on the wall and moved out the round table and lamp. We found an antique pine side table (with fabulous spindle legs) at a thrift store for $35. It is in awesome condition and fit perfectly! I added a painting of a nest to bring in a little color and built and stained a farmhouse style backing for it to hang on. The lamp came from the dining room, but she didn't need it in there anyway :)
And the bookshelves...oh, the glorious multi colored bookshelves that used to look like this...
got a fresh coat of primer and paint, a few shelves were removed, and the rest were styled a bit with things
she already had...now look like this...
There were several things that made this room difficult. There are a lot of doors, and windows, and built-in bookshelves. I tried her furniture in a million...ok, maybe a trillion...different places. In the end, the room was too small to have it any other way. I wanted the sofa to be centered and floating in front of the door to the backyard. When I tried, that put it in the middle of the room, leaving no area for the love seat or anything else. Boo. So everything went back to the walls, while the husbands chair was moved from one side to the other and pulled out just a bit. Speaking of the chair...oh...the chair...did anyone wonder where it went?...here you go...

This brings me to the reason I haven't written about this room. She still has the red plaid chair, and still doesn't know what to do with it...recover, slip cover, or look for a replacement. This is real life though, and sometimes decisions can't be made in a day, a week, or even a month. Here is the break down of what was spent, and yes...that is another consideration in the chair...
Paint, Primer, and Supplies $40
Drop Cloth Panels $20
Nest Painting and Wood Frame $30
Paint for lamps $3
Lamp Shades $28
Antique Pine Side Table $35
The grand total is $156. That is a lot of bang for the buck!!!
Rachel :)