Showing posts with label Paint. Show all posts

Thursday, May 3, 2012

Recreating a $500 Wooden Sculpture

Pinterest. Ugh. Not only does it make my mind race with a million ideas, it was the source where Marlene found a wooden sculpture she fell in love with. A $500 wooden sculpture. Seriously.

Pink Door Decor

So for her birthday a few weeks ago...I (as in not really me, but Marlene) decided that I could recreate this and make it for her for much less. I can't complain...it's wonderful to have friends that believe in you more than you believe in yourself.


Mr. T bought a jigsaw for me for Christmas that was still in the box, so this was the perfect opportunity to break it in. After putting the blade in backwards, I did more than break it in, I almost broke it and cut my finger off when I made my first cut. It didn't take long and after a few cuts I was ready to go. I made a 12" pattern to use for each "petal" and used a cabinet grade 3/4 inch plywood.


After cutting and sanding with an 80 grit followed by a 220 grit, I used MinWax Weathered Oak to stain the petals.


I cut the base from a two inch thick piece of old wood, sanded it down, and stained it with Special Walnut followed with a second coat of Ebony.


The petals were put together with wood glue and held in place overnight with clamps...no nails or screws, which makes this two sided...yay! I cut a wooden dowel rod to hold it in place and used my wonderful Porter Cable Forstner Drill Bit Set to drill all the holes for the dowels. If you don't have this set, get it...it rocks my socks! After everything was dried and drilled it was ready to put together...


And again the $500 original...


And my $11 creation...


Happy Birthday Marlene!!!

Rachel :)
Pin It

Monday, April 30, 2012

DIY Cake Pop Stand


It's been a few months...but what can I say...spring means baseball, ballet, school plays, and lots and lots of fun stuff to do! I'm still working on a few DIY projects, and today I have a quick, fun project to bring you. A few months ago, a friend asked me to help her with a birthday party she was giving. A grownup, "non-cheesy" birthday party. She wanted a dessert table set up with a stand large enough to hold a variety of cake pops (yummmmm) and miniature cones filled with mousse...

I took two unfinished, different sized bar stool seats...a large one for the bottom, a smaller one for the top and measured where I wanted the holes. The drilled size of the holes for the cake pops turned out to be perfect...easy to get them in and out, yet small enough to hold them up straight. Make sure to not drill these holes all the way through. That way you can pick up the stand without them falling though. I marked an extra pop stick with a line on how deep I wanted them to sit and used it as a guide when drilling the holes. This ensured they would all sit at the same height.

The miniature cones on top needed large holes that went through the wood. I used a drill bit from a Porter Cable Forstner Bit Set (best purchase ever) to drill these holes. When I was done drilling, everything was sanded, primed, and put together using a large candle pillar from Hobby Lobby (it was bright green in its former life). The finished product was sprayed in Antique White (one of my favorite colors) and distressed using Special Walnut stain.

When the cake pops arrived from the bakery (carrot cake in white chocolate and red velvet in chocolate), I trimmed an inched off the sticks of the white ones to create two tiers on the bottom stand. The miniature cones were filled with a variety of mousses (after I snapped this picture) and the dessert table was complete!


Yummy!!!

Rachel :)

sorry for the complete lack of pictures...i seem to be on the fly recently, only snapping pictures with my cell phone. email me with any questions!
Pin It

Tuesday, January 17, 2012

The $150 Living Room UpDate

Confession...


I finished my part in Shan's living room about two months ago. That's right. It took me about a week to prime, paint, sew panels for the windows, and figure a few things out. It's great...completely different...and she loves it. We stayed on a tight budget, only spending money on paint, fabric, and a few other things. No new sofas, chairs, pillows, or flooring. We shopped from her attic and around the house. It's a great feeling when you can get a transformation without breaking the bank. Always a goal of mine. Always.

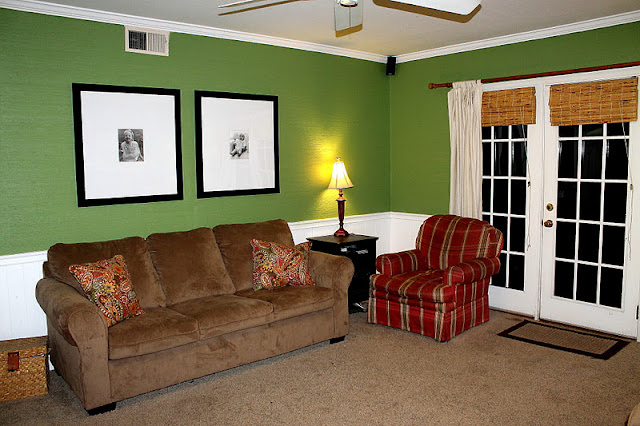
Before:


After:


Here's the breakdown of what was done...

The walls and doors were primed and painted. I used Better Homes and Gardens interior paint in eggshell from WalMart...no paint snobs here! The color is BHG809. She kept the sofas and I switched the pillows with some that were in her sitting room. I kept the original curtain rod, just painted it black and added new, longer panels made from painter drop cloths. The pictures above the sofa remained, as did one of the painted black side tables. Another black table was moved in from the dining room. The lamps (I love them!) were a treasure she found in her moms attic. Originally a terracotta color, they were painted with American Accents Spray Paint in Lagoon (it's made by Rust-Oleum) and lightly glazed with a brown stain. When I took her to the store to look at colors to paint the lamps, Shan looked at me and said, "You know turquoise is my least favorite color, right?!?"...well, guess who won?...just saying...

New lamp shades were purchased (on sale) at Target to complete that side of the room. On the other side I took down the pictures on the wall and moved out the round table and lamp. We found an antique pine side table (with fabulous spindle legs) at a thrift store for $35. It is in awesome condition and fit perfectly! I added a painting of a nest to bring in a little color and built and stained a farmhouse style backing for it to hang on. The lamp came from the dining room, but she didn't need it in there anyway :)

And the bookshelves...oh, the glorious multi colored bookshelves that used to look like this...


got a fresh coat of primer and paint, a few shelves were removed, and the rest were styled a bit with things she already had...now look like this...


There were several things that made this room difficult. There are a lot of doors, and windows, and built-in bookshelves. I tried her furniture in a million...ok, maybe a trillion...different places. In the end, the room was too small to have it any other way. I wanted the sofa to be centered and floating in front of the door to the backyard. When I tried, that put it in the middle of the room, leaving no area for the love seat or anything else. Boo. So everything went back to the walls, while the husbands chair was moved from one side to the other and pulled out just a bit. Speaking of the chair...oh...the chair...did anyone wonder where it went?...here you go...


This brings me to the reason I haven't written about this room. She still has the red plaid chair, and still doesn't know what to do with it...recover, slip cover, or look for a replacement. This is real life though, and sometimes decisions can't be made in a day, a week, or even a month. Here is the break down of what was spent, and yes...that is another consideration in the chair...

Paint, Primer, and Supplies $40
Drop Cloth Panels $20
Nest Painting and Wood Frame $30
Paint for lamps $3
Lamp Shades $28
Antique Pine Side Table $35


The grand total is $156. That is a lot of bang for the buck!!!

Rachel :)


Pin It

Saturday, December 31, 2011

These are a few of my favorite things...

Before we sent 2011 off, here are a few of my favorite projects from the past year...


Smurfettes Lemonade Stand...this was by far my favorite!! I learned it is a pain in the a$$ to take apart pallets, but we had such a fun time as a family making this!


Budget Breakfast Nook...It is so incredibly awesome to NOT have the washer and dryer in the kitchen anymore! And we were able to create this on a super slim budget after finding a great piece at our Habitat ReStore!


Kids Outdoor Chalkboard...I learned that making outdoor chalkboard paint is harder than it looks, but the kids LOVE this! Neighbours comment on it when they drive by and after 6 months it is still in perfect condition...yay!


Jules Back Deck...My very first total design project where I got to spend someone else's money and do what I wanted. This was a fun, stressful, learning experience. They love the end result, as do I, and I hope to be able to do this again!

via The Lettered Cottage
Spackle Can Change Your Life...In September I went to Atlanta to help Layla and Kevin and the people from HGTV shoot a TV pilot. Seriously. I learned so much...about Spackle and about myself. Hopefully January will bring great things for this sweet couple...I'll keep you posted.


Of course there are other projects I loved like making homemade vanillaour wonderful new laundry closet, and the kids homework area.

The past year I fell in love with old windows, wood pallets, and chalkboards.

We grew as a family and the Smurfs proved that they are old enough to help with projects and make design decisions. :) I grew as a person by taking my first big solo trip to Boston and realizing they would survive without me.

Marlene decided she didn't want to blog anymore because she didn't have anything to say, but I'm still trying to convince her to come back because she is by far the funniest person I know. And she's my best friend. And I love her.

Overall, it was a great eye opening, learning, wonderful year and I am so looking forward to 2012...

Happy, Happy New Year!

Rachel :)
Pin It

Monday, November 7, 2011

Thinking About Nudity...

You read that right...I'm thinking about nudes. As in the kind you hang on your walls. You know...the kind that show a little...ummmmmmm...something...

For the record, I heart them.  Seriously. When done well, I think they can be beautiful, capturing the essence of the human soul. My medium of choice is charcoal, although I like oil and acrylics as well. Last week I was in an antique store that sells on consignment. I found a charcoal of a nude woman that I loooooooooved. Really, really loved...

me, "Would you ever let me hang a picture of a nude woman on the wall?..."

Mr. T., "NO." "Absolutely not." " Double hockey sticks no."

It was basically a conversation as simple as that. Oh yes, we have very different ideas when it comes to art. Extremely different. While I'm not big on prints, for years I wanted this:
Gustav Klimt

Anything by Klimt makes my heart beat a little bit faster. I love his work and I think this is beautiful, loving and warm...Mr. T thinks I'm odd. Recently I've seen several original works on etsy that are just as wonderful...

Original Painting Watercolor Abstract - Nude Study VI - Modern Contemporary Art Portrait in Red and Yellow
etsy
 
Open Edition Print - Art of the Figure
etsy

Classic Art of the Figure - Charcoal Drawing Open Edition Print
etsy

I would love one or any of these...have I completely offended you? What's the general take on nudes...?

Rachel :)
Pin It

Sunday, October 30, 2011

In Living Color

Last week I started to work on a living room....

before
This room belongs to my dear friend Shan...She is cute, smart, funny, and she loves color...but she is ready for a change! She is saying goodbye to the green walls and hello to a much more neutral color. We've been talking about doing this for several months and she's been holding out on me. Seriously, the wall color was picked out and the paint was bought about two months ago... I finally pinned her down on a day (she cancelled on me twice) and we got to work last week. I think I'm the bossy, motivating force behind this makeover and I'm really hoping we are still friends when it's over. So far, so good...there was only one minor meltdown last week after the walls were painted and it wasn't from me...Here is what the rest of Shan's family room looked like a few days ago...


And here is a little more information about Shan...her kids are stinking adorable...


as is her dog...


and she loves monograms...


really, really loves monograms...


Her husband is just as cute as the rest of the family, and is uber, uber talented. Check out this awesome frame he made...complete with a picture of their beautiful daughter...


They moved into their house six years ago, and did not paint the family room. Her main goal is to move to a more neutral pallet. She doesn't want her house to look like "an Easter egg basket" and she wants to update the look in this room. I found a great little piece of vintage inspiration  for this project and can't wait to tell you about it...

Rachel :)
Pin It