Showing posts with label Sewing. Show all posts

Wednesday, March 14, 2012

DIY Jeans...Keeping the Original Hem


Last week I did something I almost never do...went shopping. For clothes. For me. Not my favorite thing to do (who needs to buy clothes when your best friend keeps you stocked), but Shannon managed to drag me to the mall for an hour of fun at The Gap. It also helps that her sister works there...which equaled a nice discount.

One hour, a few dollars, and some major dressing room meltdowns later, I walked out with a bag full. Two needed purchases: new jeans. I'm not really sure who they make jeans to fit, but it definitely isn't me. And it really stinks to spend money on clothes to turn around and have to have them altered. But, at the end of the day, the jeans were really long. As in way toooooooo long. So I decided to pull out the sewing machine and try to hem them myself. And to keep the original hem. There's nothing worse than a pair of badly hemmed jeans...well, there are a lot of things worse, but you get the idea...

Step 1: Determine the length you want your new inseam to be. Subtract it from the old inseam. Divide the difference by 2. For me this was 32-29=3. 3 divided by 2 = 1.5

Step 2: Make a cuff the size of your number and iron it down.


Step 3: Turn the pants leg inside out and stitch along the orinigal hem.


Step 4: Stitch up the side to prevent the cuff from falling down.


Step 6: Turn jeans right side out and press.


Some people might cut the excess fabric off. Because I didn't have that much, I decided to stitch the sides up and keep it. New clothes are awesome. New clothes that fit are even better. Especially when alterations were $0!

Rachel :)


Pin It

Tuesday, January 17, 2012

The $150 Living Room UpDate

Confession...


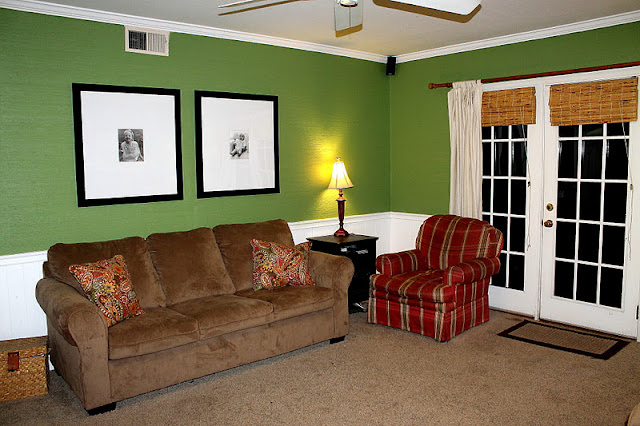
I finished my part in Shan's living room about two months ago. That's right. It took me about a week to prime, paint, sew panels for the windows, and figure a few things out. It's great...completely different...and she loves it. We stayed on a tight budget, only spending money on paint, fabric, and a few other things. No new sofas, chairs, pillows, or flooring. We shopped from her attic and around the house. It's a great feeling when you can get a transformation without breaking the bank. Always a goal of mine. Always.

Before:


After:


Here's the breakdown of what was done...

The walls and doors were primed and painted. I used Better Homes and Gardens interior paint in eggshell from WalMart...no paint snobs here! The color is BHG809. She kept the sofas and I switched the pillows with some that were in her sitting room. I kept the original curtain rod, just painted it black and added new, longer panels made from painter drop cloths. The pictures above the sofa remained, as did one of the painted black side tables. Another black table was moved in from the dining room. The lamps (I love them!) were a treasure she found in her moms attic. Originally a terracotta color, they were painted with American Accents Spray Paint in Lagoon (it's made by Rust-Oleum) and lightly glazed with a brown stain. When I took her to the store to look at colors to paint the lamps, Shan looked at me and said, "You know turquoise is my least favorite color, right?!?"...well, guess who won?...just saying...

New lamp shades were purchased (on sale) at Target to complete that side of the room. On the other side I took down the pictures on the wall and moved out the round table and lamp. We found an antique pine side table (with fabulous spindle legs) at a thrift store for $35. It is in awesome condition and fit perfectly! I added a painting of a nest to bring in a little color and built and stained a farmhouse style backing for it to hang on. The lamp came from the dining room, but she didn't need it in there anyway :)

And the bookshelves...oh, the glorious multi colored bookshelves that used to look like this...


got a fresh coat of primer and paint, a few shelves were removed, and the rest were styled a bit with things she already had...now look like this...


There were several things that made this room difficult. There are a lot of doors, and windows, and built-in bookshelves. I tried her furniture in a million...ok, maybe a trillion...different places. In the end, the room was too small to have it any other way. I wanted the sofa to be centered and floating in front of the door to the backyard. When I tried, that put it in the middle of the room, leaving no area for the love seat or anything else. Boo. So everything went back to the walls, while the husbands chair was moved from one side to the other and pulled out just a bit. Speaking of the chair...oh...the chair...did anyone wonder where it went?...here you go...


This brings me to the reason I haven't written about this room. She still has the red plaid chair, and still doesn't know what to do with it...recover, slip cover, or look for a replacement. This is real life though, and sometimes decisions can't be made in a day, a week, or even a month. Here is the break down of what was spent, and yes...that is another consideration in the chair...

Paint, Primer, and Supplies $40
Drop Cloth Panels $20
Nest Painting and Wood Frame $30
Paint for lamps $3
Lamp Shades $28
Antique Pine Side Table $35


The grand total is $156. That is a lot of bang for the buck!!!

Rachel :)


Pin It

Tuesday, November 15, 2011

$50 Room UpDate

Shannon's living room has a few more tweaks before I show the entire room, but I am super excited to bring you a sneak peak. Yes...its only a wall...but a great new look...Remember before?...


This wall of a door and windows leads out to their backyard. Here is what it looks like today...


Completely different. Minimal money. Seriously. I started by removing the window panels, bamboo shades, and the wooden grid on the door and windows. I primed and painted the walls and doors. I kept the same curtain rod (really I would have liked to used a longer one, but sometimes you need to use what you've got), sprayed painted it black and gave it a RAISE! If you are hanging panels, raise the rod!! We discussed using the old panels and sewing fabric to the bottom to lengthen them, but ended up purchasing two drop cloths instead (I love those things) and hanging them. Total cost for the paint and panels was about $50.

She went from being scared of going too neutral to loving the new look! The black door keeps the color pallet neutral but adds enough contrast to make her happy. Happy Shan =  Happy Rach!!

Rachel :)
Pin It

Saturday, October 22, 2011

Where Is Your Work Station?

Once again, I blinked and the week was over. I'm almost finished with Jules' deck, and in the meantime, my house has become a disaster area. Seriously. I find myself working in every room. The dining room table has been transformed into a sewing table. We had some rainy weather this week, so the kitchen became a painting/dying space for small projects like this I'm working on for her...

i know you can't tell what it is...i can't give everything away!
I'm using the den for major storage...furniture, pillows and cushions, lights, and pots. That leaves the carport...errrr...the carport has become the "real" work zone. It's where we built the pallet bench and where I am working on this beauty...


Of course, it wouldn't look like this without the help of this...


 and this...


Like my projects, I am all over the place these days. Where is your favorite place to work?

Rachel :)
Pin It

Tuesday, September 6, 2011

You Win Some, You Lose Some Part I

I began the long weekend with 4 projects in mind. Actually, I always have a million projects in mind...this weekend I followed through with 4. If you've been reading, then you know two were successful. My new door numbers and my skirted kitchen sink rock my socks. The other two are equivalent to poop in my pants. Seriously.

Last week I worked on some pillows for Marlene. She's trying to brighten up her living room and instead of replacing the sofa, she's replacing the pillows. Actually, she's clicking on the computer and ordering fabric. I'm replacing the pillows. She demanded kindly told me that she wanted 6 pillows: two from Target, two yellow ikat, one navy and white chevron, and one solid navy. She bought the Target pillows, ordered ikat fabric (shipped it to me) and told me she would buy a navy one. The yellow ikat pillows turned out great! The chevron...well...

Marlene never found a navy and white chevron fabric that she liked. She got the bright idea i could sew stripes together and create a chevron...no thanks. I found a great white linen and thought maybe, just maybe, I could paint a chevron pattern on it. I was wrong. Boo. I cut the fabric, then cut 64 pieces of tape to put over the white. I then painted in between the tape with navy fabric paint. I thought it would be genius until I pulled the tape off and discovered the paint had bled underneath. I then sent Marlene a text that said, "I hate you and your chevron pillows." I didn't hear from her for two days which is like ten years in our world. While she was out living up her childless 3 day weekend, I was at home laboring over labor day. Laboring over her pillows...see the following...


Perhaps I should have titled this posted, "how to make crappy drippy chevron pillows"...tomorrow I'll follow up with my other poop in the pants project.

Rachel :(

I'm supposed to photograph fruit for todays challenge, but have none in the house. Seriously. Not even canned oranges. I'll post again tonight...


Pin It

Sunday, September 4, 2011

Skirted Sink

Did you read this post about my most favorite of all time kitchen? Here's another picture...


for the love of a house
Oh how I heart the linen skirt under her kitchen sink. Such an easy fix to break up lots of bottom cabinetry...genius! I pulled out the sewing machine (technically it was out because of these...) and got to work...before...


and after...


This was a cheap and simple project...the best kind! I removed the cabinet doors, sewed a rectangle from 2 yards of burlap with a hem at the top to thread a tension rod through. The burlap was $7.20 (I had a 40% off coupon from Hancock Fabric) and the tension rod was $5.99 from Kmart. I could have gotten one for $2.99, but wanted one a little more sturdy. I'll let you know how it holds up. The shot today for the Photography Challenge has to be from a high angle. One more of the kitchen...


Happy Sunday!!

Rachel :)


Pin It