Sunday, October 16, 2011

DIY Outdoor Sectional

Oh...Sunday Funday is over. The Smurfs are in bed, and I am reflecting on everything I did and did not get accomplished this weekend. If you read Friday's post, then you already know I've been planning and shopping and working on a friend's deck. I am taking her space and turning it into two usable areas...one being a seating area. Mr. T and I got started on it this weekend by building a sectional bench made from none other than pallet wood. I love to recycle it any chance I get and this is the third project we have done using pallets (here and here). Instead of tearing them apart like we did last time, we (meaning he) cut them down, sanded them, added 4x4 legs and a side apron to create two pieces that form an "L" shaped bench. I already have the cushions and pillows, but have to leave some things as a surprise for the end of the week!

always good to be nice and level

front corner


love old wood...

Mr. T working his magic

side

side
It doesn't matter if I'm doing something for us or someone else, I am always working on a budget. Just another reason I heart pallets...they are free or super cheap. We used two 3' x 4' pallets for this project that I was able to get for $0! We needed 10 feet of 4 x 4 wood for the 8 legs and a few miscellaneous items like 3" decking screws and sandpaper. The total cost was $15 and it took about 5 hours. Worth it? I think so! I have great plans for this piece and can't wait to share more!

Rachel :)
Pin It

Friday, October 14, 2011

Other Peoples Money

I'm not really sure where the week went. I blinked and it was Friday. Seriously. Does anyone else ever have weeks like that? Something super fun did happen this week...I went shopping...with someone else's money! That's right...a friend of mine (because a random person off the street sure wouldn't) asked for my help in decorating her back deck. Her very new, very nice back deck. We were able to sit down together Tuesday afternoon and talk about her hopes for the area. She had a lot of ideas, a budget, and was ready for me to get started! While I have helped people with projects before, this is a first for me. Lets just say that making decisions and spending other peoples money has me a little stressed. I am hoping to finish this project next week (yikes) not only because her parents are coming to visit, but so I can sleep at night! Here are a few before pictures...


The area is a good size...20 x 10. The plan is to turn it into an outdoor room with a seating area and a dining area that seats more than the four her current table seats. The only thing on the deck I am keeping is the umbrella. Everything else will find a new space to live. It's a super fun challenge and I will be using several items I found in her basement along with some new things I've shopped around for. As always, I will build one or two things and upcycle as much as I can. Hopefully I'll have an update or two soon with the final reveal at the end of next week! Wish me luck!!!

Rachel :)
Pin It

Monday, October 10, 2011

Apple-Cream Cheese Cake

Last week, the husband of a dear friend of mine deployed overseas. In trying to keep her upbeat, busy, and happy, I dragged her out this morning for a 5 mile run in the rain. Actually, the run was her idea, the rain was out of our control, and the 5 miles were my idea. I tricked her into thinking a long loop was a short loop and 5 miles later we were soaking wet and she had a few choice words for me. There were four of us that ran together on this dreadful Monday morning, but the miles flew by with great friends and great conversation. I'll admit that when it was over we all felt a little (maybe a lot) tougher, stronger, and despite the weather...happier.


When I got home I saw a Southern Living magazine (September 2011) on the kitchen counter that she had been flipping through a few days prior. While looking through, she told me that for her birthday she wanted me to make the Apple-Cream Cheese Bundt Cake that was featured on the cover. Great...I'm all in...but her birthday is not until March. Seriously. So, on this rainy afternoon I found myself thinking why wait until March!?! Life is short...lets eat cake! I sent her a text and invited her and her three adorable kids over for dinner and cake. Because what can be better on a cool, rainy, fall night than friends and cake!


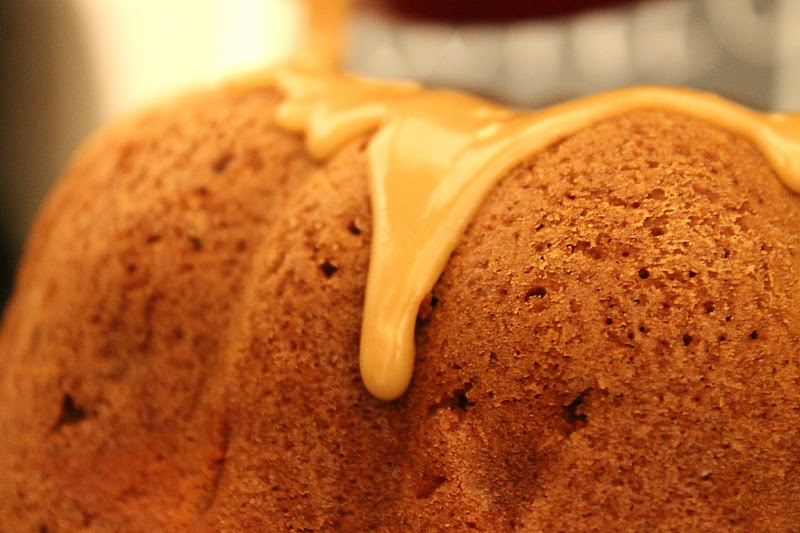
and here's the picture from Southern Living...because mine wasn't quite as pretty, but it was so good I'm sure my stomach didn't notice...

Apple-Cream Cheese Bundt Cake Recipe

Ingredients

  • CREAM CHEESE FILLING:
  • 1 (8-oz.) package cream cheese, softened
  • 1/4 cup butter, softened
  • 1/2 cup granulated sugar
  • 1 large egg
  • 2 tablespoons all-purpose flour
  • 1 teaspoon vanilla extract
  • APPLE CAKE BATTER:
  • 1 cup finely chopped pecans
  • 3 cups all-purpose flour
  • 1 cup granulated sugar
  • 1 cup firmly packed light brown sugar
  • 2 teaspoons ground cinnamon
  • 1 teaspoon salt
  • 1 teaspoon baking soda
  • 1 teaspoon ground nutmeg
  • 1/2 teaspoon ground allspice
  • 3 large eggs, lightly beaten
  • 3/4 cup canola oil
  • 3/4 cup applesauce
  • 1 teaspoon vanilla extract
  • 3 cups peeled and finely chopped Gala apples (about 1 1/2 lb.)
  • PRALINE FROSTING:
  • 1/2 cup firmly packed light brown sugar
  • 1/4 cup butter
  • 3 tablespoons milk
  • 1 teaspoon vanilla extract
  • 1 cup powdered sugar

Preparation

  • 1. Prepare Filling: Beat first 3 ingredients at medium speed with an electric mixer until blended and smooth. Add egg, flour, and vanilla; beat just until blended.
  • 2. Prepare Batter: Preheat oven to 350º. Bake pecans in a shallow pan 8 to 10 minutes or until toasted and fragrant, stirring halfway through. Stir together 3 cups flour and next 7 ingredients in a large bowl; stir in eggs and next 3 ingredients, stirring just until dry ingredients are moistened. Stir in apples and pecans.
  • 3. Spoon two-thirds of apple mixture into a greased and floured 14-cup Bundt pan. Spoon Cream Cheese Filling over apple mixture, leaving a 1-inch border around edges of pan. Swirl filling through apple mixture using a paring knife. Spoon remaining apple mixture over Cream Cheese Filling.
  • 4. Bake at 350º for 1 hour to 1 hour and 15 minutes or until a long wooden pick inserted in center comes out clean. Cool cake in pan on a wire rack 15 minutes; remove from pan to wire rack, and cool completely (about 2 hours).
  • 5. Prepare Frosting: Bring 1/2 cup brown sugar, 1/4 cup butter, and 3 Tbsp. milk to a boil in a 2-qt. saucepan over medium heat, whisking constantly; boil 1 minute, whisking constantly. Remove from heat; stir in vanilla. Gradually whisk in powdered sugar until smooth; stir gently 3 to 5 minutes or until mixture begins to cool and thickens slightly. Pour immediately over cooled cake.
Don't let the directions and ingredient list intimidate you. Most everything I had in the pantry. It did however, take some time...the cake took about an hour to make. Confession...I didn't peel the apples. It baked for 75 minutes and cooled for two hours. The Praline Frosting was so easy and went on great. This should be a must bake for everyone this fall! Enjoy!

Rachel :)
Pin It

Sunday, October 9, 2011

Organizing 101

I am always on a quest for new organizing ideas that are cheap and easy. If it takes a lot of maintenance, it won't last around here. Here are a few genius ideas that I've stumbled on recently...

This year, take all the holiday cards and pictures you get, punch a hole in the side, and hold them together with a metal clasp. When the holidays are over, pack them up with the rest of the decor and get them out year after year to display on a table! Easy and fun!!

Pinned Image
Allen Designs

House paint chips...I am always somewhere, second guessing a purchase, wondering if it will look good with my wall color...no more!! Here is a loop of wooden chips, painted to represent the different colors of a house....genius!!
Pinned Image
Addicted 2 Decorating

If you have wrapping paper all over your house...this is for you! It's a metal trash bin on wheels...the perfect size to hold lots and lots of rolls of paper...perfect!!

Pinned Image
Chez Larsson

I have two of these containers that came from Hobby Lobby. Find them at you nearest craft store and fill the compartments with different size batteries that your family uses. How great to have all of these in one spot...you will never run out of batteries again!!!

Pinned Image
Better Homes and Gardens

How easy...how simple! If you have a great organizing tip, let me know!

Rachel :)

Pin It

Saturday, October 8, 2011

Providence Canyon

We celebrated a weekend of nothing (no call for Mr. T, no baseball, no dance, no birthday parties...you get the picture) by taking advantage of the beautiful weather and taking the kids hiking in a local state park. Providence Canyon is also known as The Little Grand Canyon...ok, so it's far from the Grand Canyon, but makes for a great day trip. We packed snacks and water and made the 3 mile loop in no time at all!


We had to hike down before hiking up!

sibling love :)

yikes!!!

yummy trail mix...yucky hands!!!

old cars creating animal habitats

white trail blazes

mile marker 1

finally...the canyon!


Enjoy the weekend!

Rachel :)

Pin It

Wednesday, October 5, 2011

25 Ways to Wear a Scarf

I know...I'm the last person you should take fashion advice from. I wear jeans and Converse...everyday. And if you are lucky enough to catch me in something other than sneakers, watch out...they might be slippers...whoops! But I love a good scarf and had to pass this video on...


Rachel :) Pin It

Sunday, October 2, 2011

Pumpkin Muffins and More...

When the weather gets nice, my attention span tends to not function, resulting in DIY overload. It happened this weekend. I started by deciding that the table in the breakfast nook was too dark and maybe I needed to strip it...


I should have been doing laundry...


Or cleaning the kitchen...


But when I sat down at the computer and pulled up Pinterest (hello...I have a problem), I saw some pumpkin muffins that I had to make. That minute. Thank goodness I had everything I needed, because I never over buy when Publix has awesome B1G1...hmmmmmm....

You will need a whopping two ingredients...


Canned pumpkin and cake mix...that's it! The recipe calls for Golden Yellow. All I had was Butter Golden...Butter=Good...


I mixed them together with my mixer from 1974. That's right. 1974. Don't hate. It's a MixMaster with a Burst Of Power. When my mom and dad married, my grandfather thought every good southern woman should have a mixer. So he bought this one for my mom. When I moved into my first apartment, I inherited the mixer. It rocks my socks. Seriously. Mixing is a lost art...as is sanding...


Mix and divide.  


Bake at 350* for 20-25 minutes.


When they come out, they will be as awesome as these...just add a little powered sugar. Or turn into Martha Stewart and make some homemade cream cheese icing. I had laundry and cleaning and sanding calling my name...

Rachel :)


Pin It