Pages

Tuesday, May 31, 2011

Overzealous

I've told you guys about my fascination...addiction...to Pinterest. Here's a picture I found the very first day:


OMG...What kid would not want this in their backyard? Smurfette and Brainy Smurf would LOVE it and since I have a another addiction to chalkboard paint, I would love it too! The day after I saw this we went to the hardware store to get everything we needed...

4 x 8 plywood
black primer
black outdoor paint
unsanded tile grout

The directions on Pinterest read:
Outdoor Chalkboard: Get a 4 x 8 plywood sheet and mix a chalkboard-colored outdoor paint with unsanded tile grout: 1. Pour 1 cup of paint into a container. Add 2 tablespoons of unsanded tile grout. Mix with a paint stirrer, carefully breaking up clumps. 2. Apply paint with a roller or a sponge paintbrush to a primed or painted surface. Work in small sections, going over the same spot several times to ensure full, even coverage. Let dry. 3. Smooth area with 150-grit sandpaper, and wipe off dust. 4. To condition: Rub the side of a piece of chalk over entire surface. Wipe away residue with a barely damp sponge.

Oh, sounds so easy and fun, right?...Wrong! I primed the board first...easy! When it was dry we were ready to paint...and yes, I said paint. Honestly, that's what I thought. Until I mixed the tile grout with the paint. Ugh! I'm not a tile expert. Actually, I'm a tile unexpert. I know nothing about tile or grout. Zip. Zero. Nada. Point taken? So, I really didn't know that when I mixed the grout with the paint that I would have a mess. A big, fat, hard to stir, clay-like, tar looking mess. That you can't paint on. Oh yes, its was that hard. Thankfully I had a set of gloves in my handy dandy painters box. Along with an old paint brush. My mixture was thickening up...fast! I went to work spreading with my gloved hand and brushing smooth with the other hand. It was everywhere! Here's what I learned:

1. Don't mix more than one cup at a time
2. Start in the middle of the board
3. Work with someone
4. Seriously, don't mix more than one cup at a time
5. Stick to small areas (yes...I know that's what the directions said)

It took three cups for one side of my 4x8 board. And now I understand the sanding part. Before, I was ready to skip it. It also helps to not tackle this project in the heat of the day...it was hot! But, as always, we survived. Mr. T and I hung the finished product this morning. The Smurfs are visiting their grandparents for a few days, but when they come home I think we will get rave reviews for this project!


Rachel :)



A Marvelous Mess


Monday, May 30, 2011

The Making of a Gallery Wall

When we started working on our breakfast nook, I knew right away I wanted to have a gallery wall of pictures and art behind the bench. Crisp white frames with white mats and lots of colorful art. I want to be able to sit, have a cup of coffee, read a magazine or book (ok...so I don't really have THAT much free time) with reminders of my family smiling down. If you read Friday's post, I shared with you pictures of gallery walls that I liked. My favorite was the wall by Young House Love, so I used them for inspiration. They are also design geniuses and give really super directions on their website.

So with my mind made up, I spent a few weeks picking out frames here and there. I didn't want them to be too matchy matchy so they came from various places, all on sale or clearance...they only way to go! After picking out artwork and frames, I sat on the floor with them, moving and turning until I came up with a design. I traced all the frames on newspaper, cut them out, then taped them on the wall where I wanted them to go. While the process was time consuming, it made hanging so much easier and painless! I'm waiting until the big reveal before I show you the finished wall, but I'll post a few sneak peaks today...

starting small...

making a mess...

more mess

lots of bent nails...this happens a lot with plaster walls!
While this doesn't show much, maybe it will help you with a gallery wall in your house!

Rachel :)

Friday, May 27, 2011

Gallery Wall Inspiration

Inspiration for the kitchen...

View in Room
Pottery Barn


Young House Love


[6204.jpg]
Pinterest

Decor Pad

The Sassy Kathy

High-Heeled Foot in the Door

my favorite...Young House Love

These definitely give oodles of inspiration for the kitchen!

Rachel :)

Thursday, May 26, 2011

Working on the Bench...

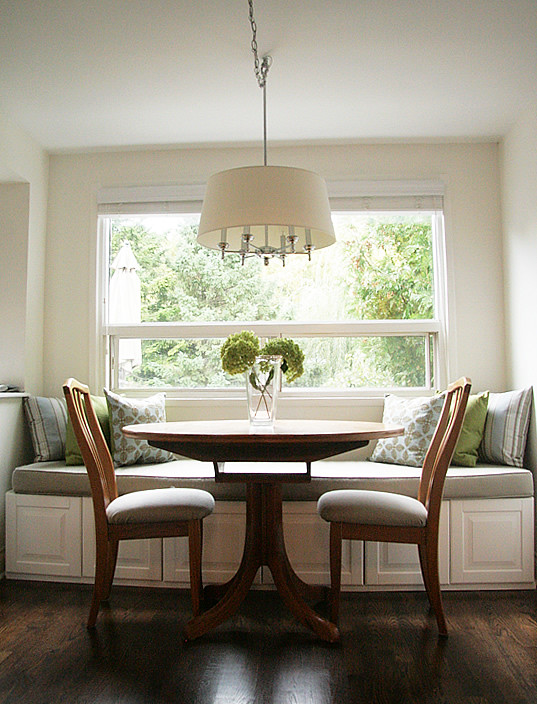
Mr. T and I have been working hard taking our breakfast nook from this:


to look more like our inspiration:

040

We scored BIG when we found this for $50 at our local Habitat ReStore:


The custom bench that was custom for someone else's very large kitchen was 104" in length and 24" deep. The depth is perfect..exactly what we wanted. Our nook is 76" wide so we had to take some length off. The original bench had two drawers with two cabinets on either side. We took the drawers out (lots and lots of pulling and prying, they had seen better days) and removed the top along with the cabinet doors. Then we measured and got ready to make cuts...measure twice, cut once!!!


one side cut!

checking the measurements before we added end pieces

charlie brown approves!
After all the cuts were made Mr. T cut two new sides and used wood screw to attach them. At one point I want to do everything myself...well...one cut later and I gladly turned the saw over to the muscle behind our operation! I would much rather measure, draw lines, and bark orders...just kidding...not really! When the side were attached ( I primed them first), I got busy with the hand sander. A few coats of paint later we were watching the paint dry, ready to move this beauty inside! Time to get busy deciding on what was going on the back wall...


Rachel :)

Wednesday, May 25, 2011

DIY Throw Pillows

When I recently purchased new linens for the master bedroom, the duvet came with two king shams that I didn't need. We have a queen bed, but I like king bedding so it hangs below our very thick matress. With a few simple steps I turned the king shams into throw pillows. The great thing about this super easy project is that you can sew a few seams or use a no sew method like stitch witchery. Here's how...

I turned the sham inside out and laid it flat, pillow opening side up.


I bought two covered down throw pillows on clearance to use as fillers. I removed their cover and used it to measure against the king sham. My job was super easy because they were the same height as the king sham so I just needed to take a few inches off the sides.


I folded the king sham to where I needed to cut (very technical, I know), using the removed cover as a quide.


Once the cuts were made, one on each side, I sewed them together. Stitch witchery or another fabric bonding agent will work just as well.


I turned the new and improved sham right side out, ironed and stuffed the pillows in...


Super easy! Throw pillows can be expensive and hard to find. Next time you need some try thinking outside the box. Look for ugly clearanced pillows whose covers can be removed. Try shams that are too big so you can cut them down. This project took about 5 minutes and looks great! I am considering a monogram...maybe one day!

Rachel :)


BWS tips button

Tuesday, May 24, 2011

Kitchen Progress...

Remember when our breakfast nook looked liked this?:


...and then it looked liked this...


I spent some time sanding and cleaning and got it ready to paint. I save all paint cans, organized on the tip top shelf in Smurfettes closet. I found the one labeled kitchen and went to the hardware store to get a quart. It went something like this...

Me: "I need another quart for this paint please..."

Man: "hmmmmmmmmm...Sorry, but we don't carry pastel bases anymore. I can color match, but it's not going to be the exact same color..."

Me: "Crappers..."

I thought I was being so good and staying so organized by saving old paint cans and labeling EVERYTHING! Who knew that paints change as much as fashion does...ugh... I ended up buying the paint that day. I decided to paint the two walls where all the holes had been patched and hope for the best. I painted from a wall crease to the end of the adjoining wall. So, it wasn't the exact color, but it was super close and I was happy!

3M Hand Sander...GREAT!


dust everywhere!!!


can you tell I don't get my fashion sense from Marlene?

who is really doing the work here?
 
awe...he's so cute...
Basically this is how my mind works. Which is why I have a million different projects going on at any given time. And since I discovered Pinterest, I have become ten times worse. I saw this quote today. I think I'm going to frame it and put it on Mr. T's nightstand...

She's crazy.
And just when you think
you've reached the bottom
of her craziness,
there's a crazy underground garage.
-from Will and Grace

Rachel :)

Monday, May 23, 2011

Yummy...

When I recently blogged about my master bedroom makeover, did anyone notice this...


I mean THIS...


a $50 thrift store find...seriously. Can you say L.O.V.E...

Rachel :)


Furniture Feature Fridays